Friday 30 January 2015

5 Secrets of Super Successful Video Marketing


Is it viral yet? Is it viral yet?
While going viral should never be the objective of your video marketing campaign (never ever!), the term itself has seemed to have taken off this year, exploded even…
Marketers, we’ve been hearing lots of stats like these: by 2017 video marketing will account for 69% of all consumer traffic, mobile video ads will grow 5 times faster than desktop and landing pages with videos lead to 800% more conversion.
Eek…Well, if that’s the case then you best get to grips with the best practices for ensuring your video marketing campaigns smash your objectives and propel your social media forward. Below we reveal some of our favourite tips to help you create compelling, inspiring and actionable online videos.

1. Centre it Around the Story, Not The Sale

There is a heap of sales clutter on the Internet that is actively annoying and repelling your customers. Don’t let your brand be that guy – instead, your video should be centred around the story and not the sale. Remember: the same rules that apply for written content marketing apply for video marketing – concentrate on the value you’re providing for your customers.
Make the most of the emotive power of video by appealing to your consumers’ needs and hidden desires. Scared you’ll lose leads this way? You can always place a strategic and relevant call to action alongside a tracked URL at the end of your video (just make sure it fits into your overall story).

2. Make it the Best 10 Seconds Ever

One fifth of your viewers will click away from a video within 10 seconds or less. Short and to the point – that’s what the video experts are recommending. Our advice? Get right to the grit of the tale and manage expectations from the outset (within the first 5 to 10 seconds).
Try sparking your audience’s curiosity by asking questions and using teasers to hook their attention right away. Your video should immediately convey its value and answer that “why should I watch it?” question that will be on your audience’s mind. Should they watch it because it will make them laugh, because it will inspire them to act or because it will teach them something new?

3. Lighten Up. Stop Being So Boring!

Dharmesh Shah, Founder and CTO of HubSpot says it best: “The worst thing to do is make a completely boring video. Videos that are pure marketing puff pieces don’t spread.” So what do your audience want instead? They want to laugh, they want to feel enlightened, they want to be pulled out of their boring 9 to 5s and forget about their realities. HubSpot don’t take themselves too seriously – Dharmesh insists that humour works well for their video marketing campaigns.

He goes on to say that some of their videos might be seen as ‘edgy.’ However, HubSpot try not to be too conservative. Instead, they actively encourage video creators to be creative and take risks. Think your B2B audience can’t handle humour? Dharmesh makes an excellent point: the HubSpot audience is primarily B2B (but that won’t hold them back from being entertaining). Don’t feel constrained by what’s gone before you in your industry and don’t try to emulate your competitor’s stiff tone and yawnsome script. Stand out and take a chance on being funny.

4. Optimise for Search – Tag it Up

There are plenty of tactics you can use to ensure your videos get found easier in search engines. The first thing you should do to derive the maximum SEO value from your video (before you upload your video to any sharing sites) is to host it on your own domain. It’s also important to enable embedding on your video as this will help you increase the likelihood of receiving inbound marketing links. Oh and don’t forget to avail of video sitemaps – in this nifty document Google explains how to create a video sitemap with ease.

When it comes to video for SEO, descriptions are everything. Why? Well, descriptions allow Google’s search spiders to make sense of your video and understand what the content entails. So ensure that your videos are tagged with relevant keywords and fully explained with fleshed out descriptions and unique titles. Keep this rule in mind: if it has a box, it has a purpose – Google needs you to fill it out to help you rank.

5. Educate & Prove Yourself

Did you know that 65% of your audience are visual learners? One of the most powerful methods you can use for video marketing is to educate your audience. And the great thing is that education comes in many forms. For example, you can teach your customers how to use your product or service and provide useful tips on how to make the most of it. Or you can create a webinar to showcase your industry knowledge, position your brand as a thought leader, add value to your consumers’ lives and collect leads in the process.

If you liked this article you may also like:


To view the original article Click Here

Thursday 29 January 2015

The Top 5 SEO Tips For Blogger

I could have titled this post “SEO Optimization 101” because this is an extremely basic tutorial on optimizing your Blogger blog content. Lucky for bloggers on Blogger/Blogspot, Google has made it super easy to manage your SEO settings within the Blogger dashboard. These five small SEO tips for Blogger will give you the most SEO bang for your buck.
If you are an advanced blogger you may already do some (if not most) of these things, and you are well aware that this is only the tip of SEO iceberg. I could write an entire series on optimizing your SEO on Blogger, but we are going to start with these baby steps since they are the low hanging fruit. In other words, if you don’t do anything else to optimize your SEO, at least you should be doing these 5 things.
If you are blogging on the blogger platform, here are the top 5 SEO tips for helping your blog to be found in search. All easy to do, even for beginning bloggers.

THE TOP 5 SEO TIPS FOR BLOGGER BLOGS

I want to assure everyone that none of these tips are difficult. They don’t involve any type of HTML or messing with your template. No matter how much experience you have using the Blogger platform, you can do this!

1. PRIVACY & DESCRIPTION

Did you know you have to allow search engines find your blog? I know this sounds SUPER obvious, but often it is overlooked. In many many blog reviews I have done, I have found that people don’t realize they actually need to give permission to search engines to crawl their site.
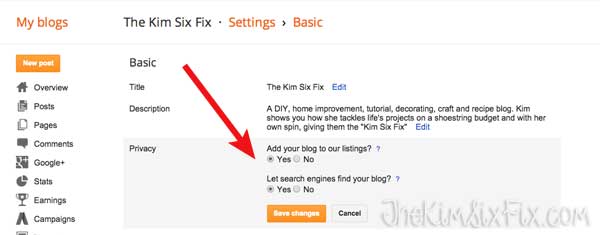
You can find the search engine permissions setting in your Blogger dashboard (Settings>>Basic>>Privacy). Make sure you have selected “Yes” to both questions:
Set your blogger privacy settings so your blog can be found on the web.
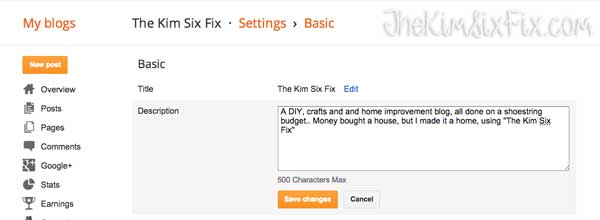
Add your blog’s description:
Add your blog's SEO description into your blogger dashboard.

2. SEARCH DESCRIPTION

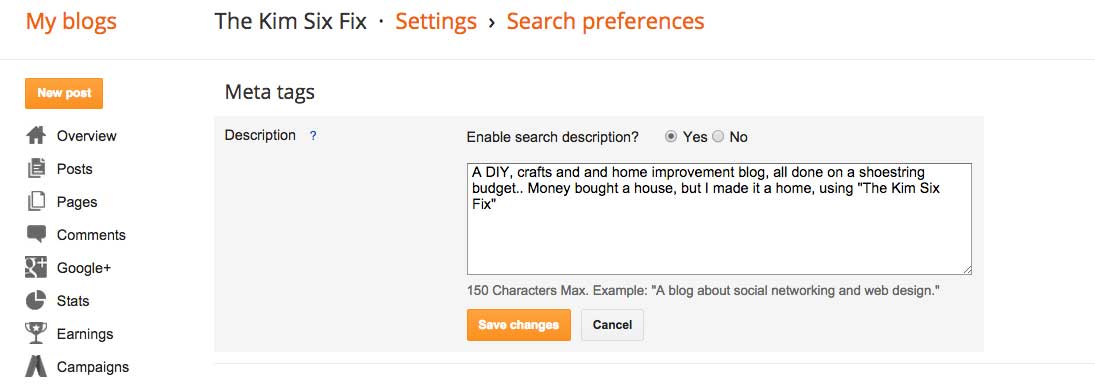
You find this setting in the Blogger dashboard under Settings>>Basic>>Search Preferences>>Meta Tags:
If you click the word “Edit” next to the description setting a box will appear for you to insert your blog description (you may already have a box there with a short description, but it may not be optimal). Keep in mind, whatever you write in this box is what is going to show up in search engine listings as the description of your url so make it good! You should have the main themes of your blog included in this description, so if you are a food blogger it should include the words ‘recipes’ or ‘food’ or ‘cooking’ while if you blog about fashion it should include ‘fashion’ as a keyword.
This isn’t the place to say “I love coffee and the color purple and my favorite animal is a unicorn” unless, of course, your blog is about sparkly coffee drinking purple unicorns.
For an example here is what my blog’s search description is:
Add your blog's description in your meta tags.
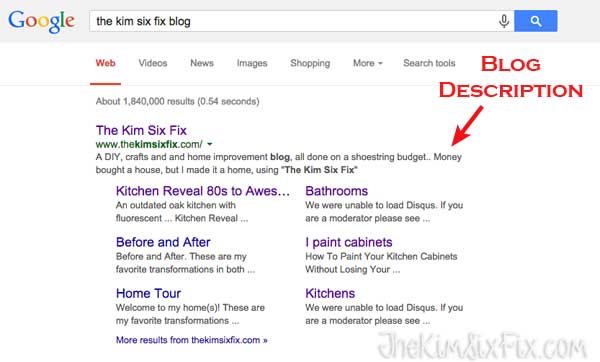
And here is what you get when you search for my blog on Google:
Your blog's description shows up in search results.
If you don’t have a blog description, Google will pull up the first line of text of one of your recent posts instead. That may mean you aren’t always putting your blog’s best foot forward.
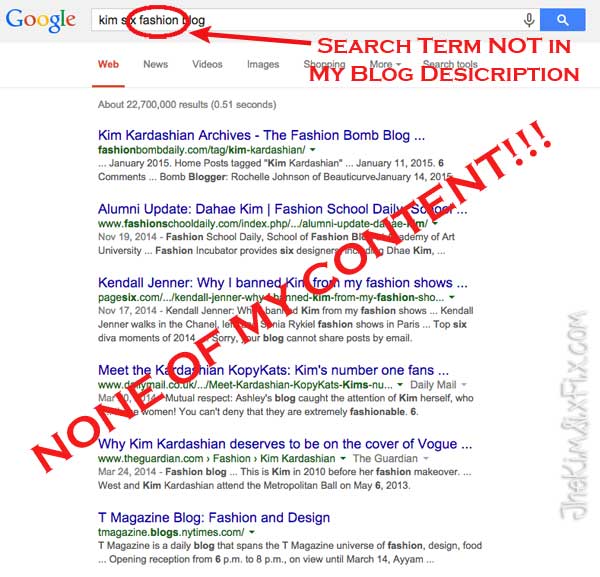
As an example of why having an accurate description is important, I modified the searches to show you how the results change.
In this case I put “kim six fashion blog”. I NEVER blog about fashion so I don’t really want Google to pull up my blog for that term. And because of my description, it doesn’t:
My blog does not show up in this search on google.
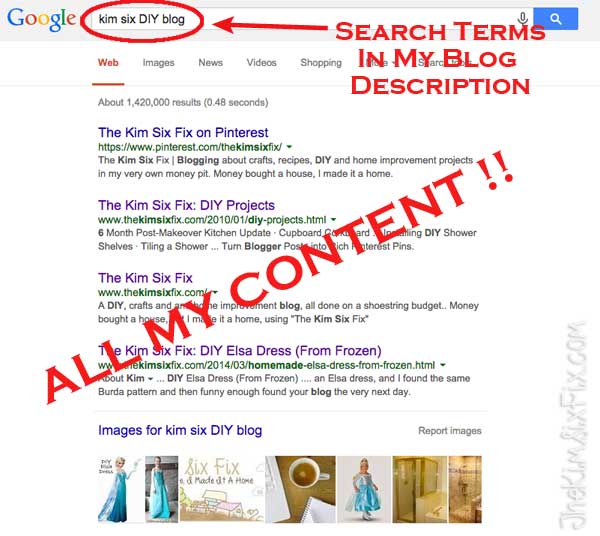
On the other hand, I do want it to pull up my blog when someone searches for the term DIY or home improvement. And low and behold, when I search for “kim six DIY blog” all the top listings are associated with my blog. THAT is the power of optimization.
My blog shows up when searching for terms in my description.

3. SEARCH DESCRIPTIONS

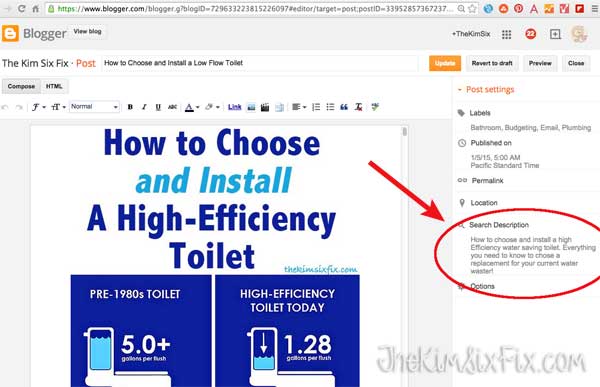
Once you edit your Blog Description in the settings panel, you will suddenly see a new option in the Blogger Posts Composition window called “Search Descriptions.”
This is exactly like your Blog Description, but it only applies to the specific URL associated with that post. Once again, you want to make sure you are including the keywords about the post content in sentence form. If you are writing a recipe for Fried Chicken your search description should include the words “Recipe” and “Fried Chicken” and perhaps the key ingredients. So something like “A fast and easy recipe for fried chicken using buttermilk and corn flakes.”
Fill out the search descriptions for each post.

4. IMAGE NAMES (BEFORE UPLOADING)

This is my one and only tip on this list that isn’t specific to Blogger. This is true no matter what platform you are using.
Google actually looks at your photo titles when searching for keywords in a post, and they are the only thing google looks at when doing image searches. Yes, search engines also look at how you tag those photos.. but we’ll talk about that in #5. If you are uploading your photos and they are labeled “IMG_13849” google is just waiting for someone to search for that term. But I hate to break it to you, nobody is searching for “IMG_13849”
Your image titles should reflect the content they are about. If you are writing a post about painting a chair and have a photo of a chair that is half painted, you could label the photo something like “painting a chair” since that seems like a reasonable thing someone would search for, plus it actually describes what the post and photo are about.
But what do you do if you have LOTS of photos of the same thing? Well, what you don’t do is repeat search terms over and over. Make sure you mix it up. Many people know better than to leave their photos labeled with the IMG labels assigned by their camera, but they still aren’t completely optimizing their images for searchability.
Here is an example of only marginally optimized image labels in a post about Painting a Chair. I see photos labels like this all the time:
  • Paint
  • Chair Before
  • Chair Before 2
  • Painting a Chair
  • Painting a Chair 2
  • Chair After
  • Chair After 2
  • Chair After 3
Do you see a problem here? There are only 3-5 real ‘key words’ in those images: Chair, Paint/Painting, Before, After
Those same images would be much more likely to come up in a larger variety of searches if they were labeled:
  • Can of paint
  • Preparing wooden chair to sand it
  • Sanding chair before painting
  • Painting dining room chair with milk paint
  • Best technique to paint furniture
  • Painted chair Before and after
  • Chair makeover Using Annie Sloan Chalk Paint
  • ASCP chair painting tutorial
How many keywords have we used for our images now? We have the same ones as before: Chair, Paint/Painting, Before and After
But now we also have: Preparing, Painted, wooden, sand/sanding, dining room chair, milk paint, technique, Best, furniture, Annie Sloan Chalk Paint, makeover, coverage, ASCP, tutorial
And isn’t that what the post is really about? Those image titles make it clear that this a tutorial about Annie Sloan chalk paint and a chair makeover.
Keep in mind when you are diversifying your photos labels, you don’t want to be keyword stuffing, where you throw in any possible related search term you can think of in an unnatural way. The labels should still be organic and actually describe the images. Don’t use titles that are nothing but a list of keywords “Paint painted chair seat sofa wood wooden” Google will catch you!

5. IMAGE ALT AND TITLE TEXT

Now that you have done all that brainstorming to come up with great image names, you can use them again to really drive it home with Google.
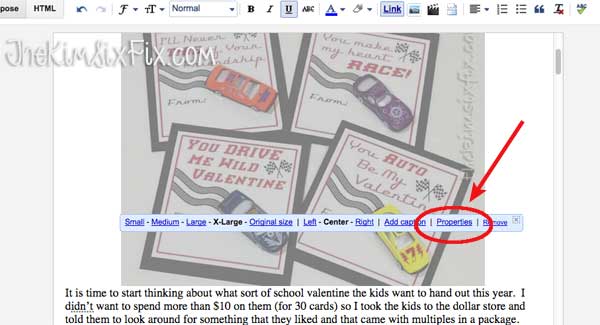
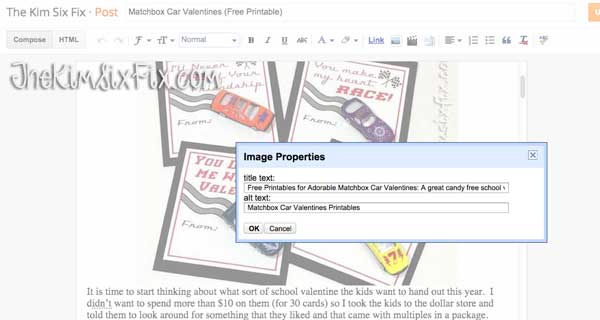
After uploading an image via the post composition window, you can click on it and it will pull up a menu for sizing, centering, adding a caption etc. One of the options in that window is “Properties” and this is where all your SEO information should go.
image-properties-box
When you click on properties it opens a window with spaces to put you your title text and alt text.
Completely filling out your title and alt text is very important when uploading images to a blog.

WHAT IS THE DIFFERENCE BETWEEN TITLE TEXT AND ALT TEXT?

The title text should be considered another way of labeling an image to reflect the content. It can be a little more descriptive and in sentence form. Another thing to keep in mind is that the title text is often the text that is pulled up by Pinterest when someone goes to pin your image.
Although this isn’t necessarily SEO, you want to include descriptions that would be good pin titles on Pinterest. And keep in mind, now that Pinterest is using keywords to sort pins, you want to make sure you are including them here as well. So in the painted chair example, you could use “This Annie Sloan Chalk Paint chair painting tutorial is one of the best I have seen and I would recommended it to anyone! Step by step photos and easy to follow instructions ”
On the other hand, the alt text is what is more important to search engines. Since google can’t “see” an image, they use the alt text to determine what your image is actually about. In some browsers the alt text are the words that pop up when you hoverover an image or if an image doesn’t load. The alt text should be sort and concise and include keywords in the same way I previously described naming your image files.
Again, you aren’t keyword stuffing the alt text, you want to keep it organic, but it shouldn’t be as descriptive as the title text. I, personally, would just re-use my photo file names in the alt text since those are already optimized.
I actually compose my blog posts in third party software which auto-populates both my alt and title text fields with my image names (score!) so I don’t have to manually go through and enter them one by one, but I do often go in modify my title text for my most Pin-friendly images.
And that is all there is to it. You have begun down the road to Search Engine Optimized content. Now those weren’t that hard were they? But the key is remembering them.
And to help with that I’ve included a free printable Blogger Post Checklist for anyone composing their content in Blogger, to help your remember and keep track of all the steps:
Free Blogger SEO Checklist Printable
I hope this has been useful (or at least a good reminder) to anyone who is worried about their SEO on Blogger. I know it can be intimidating and confusing, but it doesn’t have to be…thanks to Google’s favorite blogging platform!
If you liked this article you may also like:
To view the original article Click Here

15 Ways to Naturally Boost Your Blog Traffic

traffic-light

You put a lot of time and effort into your blog. You take the time to create interesting posts and respond to customer comments. You even publish your posts on Facebook. You swear you are doing everything the ‘right way’ for your blog, but one major problem still remains: your traffic flow stinks.
If you feel like you have tapped out all of your options for naturally boosting your blog traffic, you aren’t alone. Company blogs can fail because their writers don’t have a steady stream of ideas, just don’t have the time, or no one reads their blog. It’s hard to stay motivated when your only feedback is crickets chirping — I get it.
Giving Your Blog a Boost
Whether you have a handful of readers or none at all, you’d really like for a new audience stream to flow into your blog. The problem is that all of the obvious options aren’t working for you, and you aren’t in the game of tricking Google to score some new readers. So, what do you do when you just can’t seem to get those traffic numbers to spike?
You don’t have to give up on tried-and-true methods of naturally increasing your blog traffic. With a bit of creativity, you can breathe new life into old techniques to generate some new traffic. Here are several ways to put a new spin on old blog promotion tricks.
1. Scoring Traffic With Social: Double Your Fun By Recycling
Many small business owners are under the impression that posting your blog on social networks is a one-and-done operation. After you finish writing your blog, you log into several social media profiles, post your link, and watch the magic happen — or not.
To get more reader traffic out of your social media efforts, consider linking to your blog post multiple times. This is not the same idea as spamming; your postings will be strategically timed and relevant for your audience.
This strategy has proven to be effective, with multiple case studies supporting the idea of reposting content. With this technique, you can hit every time zone and even play with headlines. This split testing can help you understand what kind of content clicks with your audience, all while boosting your blog traffic.
Unless your particular blog post is clearly outdated, mostly any blog topic that you create is fair game to share down the road.
2. Don’t Just Share a Link
If you are already posting your link — and only your link — on multiple occasions, this may be part of your problem. While blogs can absolutely drum up engagement, sometimes you need to take a few extra steps to encourage conversation.
When you share a link to your blog post, don’t just copy/paste and go on your way. Encourage your audience to click on your link by:
  • Asking questions about your article
  • Including a unique teaser line
  • Ensuring that a graphic appears with your link
  • Tagging relevant people, companies, or keywords
You can score some extra traffic flow on social platforms just by implementing a couple of these quick techniques.
3. Involve Others in The Industry
When it comes to sharing your content, it’s a no-brainer to connect to your general audience. However, don’t forget about other like-minded marketers in your industry. By tagging and tweeting at other industry experts, you can build connections that will help your blog circulate.
Moving Your Efforts Offsite
You might think that generating content for other sources won’t result in any new traffic for your own blog, but hear me out. The idea behind this is to create additional content that is related to your blog, which will encourage an offsite audience to surf to the original source: your blog.
This may take an extra bit of effort, but this tactic is nothing new in terms of content development. This traffic-generating technique is the act of repurposing your content and sharing it on other platforms.
Here are a few examples.
4. Target Your Traffic With Slideshare
Slideshare is a popular slideshow-based community that is perfect for attracting new audiences. Although Slideshare has a heavy concentration of marketing-related content, there is still lots of room to expand on additional niches.
In order to drum up interest and actually generate traffic back to your blog, your slideshow must contain several elements. It should showcase an eye-catching design with relevant and helpful information. Aim to create the high quality content that you would have on your own blog, but spin it in the sense that makes it appropriate for a slideshow presentation.
Another key to remember when designing your slideshow is embedding your link within the slides. This link can send audiences directly to your blog, or you can double dip and embed links throughout the presentation to multiple blog posts.
Either way, this gives your Slideshow audience a direct route to your blog.
5. Increasing Traffic With Infographics
Infographics still remain as popular pieces of content. You can find infographics on almost anything, but the magic happens when they contain high quality content. Staying on trend with content repurposing, create an eye-catching infographic that correlates with a blog post you want to remote. You also have the option of starting from scratch and creating an entirely new infographic; just be sure that it contains compelling content that you can’t get anywhere else.
How and Where to Share Your Infographics
You can start sharing your infographic on your own blog. The trick here is to include a share button for social media platforms, so your audience can easily share and re-distribute your masterpiece. This option takes a little work off of your own shoulders, since you will be relying on your audience for sharing, which links right back to your blog.
Beyond social sharing buttons, be sure that your infographic includes an embed code. This way, like-minded marketers will be able to embed your infographic directly on their website. Not to mention, this is a quick way to earn some inbound links.
If you don’t happen to have an audience that’s in the sharing spirit, or if you don’t have an audience at all, there are several sources that are specifically dedicated to infographic sharing. These sources include:
  • ly
  • Flickr
  • Pinterest
  • Daily Infographic
  • com (paid submission)
These infographic directories and social media platforms can help generate traffic to your blog.
6. Understand Your Target Audience
When it comes to increasing traffic to your blog, your audience holds the decision for choosing to click your links. When you understand who your audience is and where they spend time online, it will raise your chances of generating additional traffic.
Not to mention, your core audience are the people who are most likely going to share your content. Your core audience can help reach outlying people who may be interested in your product or service.
7. Do Your (Keyword) Research
Another option to increasing your blog traffic naturally is through the search engines. In order to achieve this, you want to make sure that your keywords are actually being searched for in the first place.
Using a top-notch keyword research tool such as SEMRush can give you an overview of what your customers are searching for. While your content strategy should never be based around keyword research on its own, knowing your top keywords can give you ideas of what kind of content to create.
Above all else, be sure to implement your keywords in the most natural way possible. Not only does this establish a better connection with your audience, but it also ensures that your efforts will not be penalized by frequent Google updates.
8. Offer Your Expertise
Opportunities to promote yourself without paying a dime are everywhere, especially when it comes to offering your expertise. Search around on social community websites such as Quora or Reddit and discover a few topics in your niche.
From there, offer your best advice and expertise for those asking questions. The key here is providing a link back that points to your blog. Linking to specific blog posts is best; the more relevant the data, the better chance that you will have click-throughs from potential readers.
9. A Little Bit of Link Loving
Circling back to SEO-based opportunities for increasing your blog’s traffic flow, building a series of solid inbound links can help naturally drive traffic to your blog. However, there is an art to building links that matter, and it all boils down to quality content.
In order to build the most natural links possible, offer content that is valuable in the eyes of your readers. Content that stands as educational, entertaining, and engaging is easy for your audience to link (and like).
A bonus to creating this kind of content is that it scores on social media as well. If your content is good enough to generate some inbound links, you can bet that it is good enough to be shared on social networks.
10. Leverage Your E-mail List
Does your website have a newsletter? If not, it’s time to get the ball rolling and connect to your audiences’ inboxes. While spamming is never a recommended technique, most people appreciate free tips and advice straight to their e-mail inbox.
However, you can also leverage your e-mail list to highlight your blog and drive additional traffic. Newsletters are perfect for this, especially when they contain helpful and high quality content.
11. Curate Your Way to More Traffic
Curating content is all about finding the best quality content on the web. You share the content of others to help establish leadership status, build new relationships, and enhance the image of your brand. While your curation efforts might send traffic to your curated content initially, the benefits of curating content will give you a boost in traffic further down the line.
How does this work? Easy. You will catch the attention of your industry’s thought leaders, who may eventually return the favor and link back to your blog content. New relationships will form, which gives you the opportunity of further link building. Finally, you will build your brand, which naturally gets new traffic streaming to your blog. What more could you ask for?
12. Do What Works
If you have been in the blogging game for quite some time now, chances are that you have an idea of what drives traffic and what doesn’t. Think back to your most popular blog posts and strategize how to create spin offs of those topics. Not only that, but you can generate even more buzz from popular topics by consistently sharing on social media, just like we mentioned before.
13. Give Your Two Cents
Is there a hot trending topic in your industry that’s buzzing right now? Take this opportunity to craft a response post. Whether your opinion is positive or negative, popular topic posts naturally draw attention. 
14. Offer Free Downloads
Free downloads aren’t just for building e-mail lists. Downloads such as eBooks and guides will help educate your audience and help with branding. Not to mention, you can always embed links in your documents that go straight back to your blog.
15. Create More Content More Often
In 2013, Quicksprout analyzed their website traffic flow patterns for KISSMetrics against the number of blog topics posted per week. What they found is that it took posting 5 blogs per week to notice a significant increase in web traffic. When the website went from 5 blogs per week to 6 blogs per week, they noticed an increase in traffic of over 18 percent. Not too shabby.
Building a successful blog takes a lot of time and effort. However, these shortcuts can get traffic flowing in your direction, and help your blog reach never before imagined heights.
If you liked this article you may also like:
To view the original article Click Here

Wednesday 28 January 2015

The Sneaky Way to Create Products that Sell Like Crazy… from Day One

Deep down, you know it’s true.
The Sneaky Way to Create Products that Sell Like Crazy… from Day OneCreating a product is a natural next step for you as a blogger.
(It’s your best chance of making some real money from your blog too.)
But building a product is scary.
Not just because it means putting yourself out there for the world to judge – though that can be pretty terrifying. No, it’s scary because of all the things that can go wrong.
What if you spend hundreds of hours to build your product, and nobody likes it?
What if you invest hundreds, or even thousands, of dollars, and nobody ends up buying?
What if you pour your heart and soul into it, and the handful of customers who do buy end up asking for refunds because they never get the results you promised them?
These fears are more than justified; this is what happens to *most* people who set out to build a product.
But it doesn’t have to be that way…

Why Most Products and Courses Fail Miserably

The rewards of creating a successful product are many, but the hard truth is most products and courses don’t succeed.
The reason is simple…
Most failed products are based on an untested assumption about what customers want.
As a blogger, you know your audience better than anyone; when you have a great idea, youjust know it will change the way your audience lives and works.
But most of the time, that gut feeling is not enough to guarantee success – and few people take the steps required to go beyond their instinct to make sure the product is exactly what the market wants.
When you have a strong sense of your audience, you also have preconceived notions of what will make a great product.
But… what if you’re wrong?
What if your audience doesn’t actually have the problem you think they do?
Or, what if you are correct about the problem they’re having, but your product isn’t the solution they are looking for?
Even if you think you have a great product idea, you place its success in the hands of fate if you don’t validate that the market will actually buy it.
By leaving this step to chance, you risk the most important thing to a blogger: your reputation.
Because if your product flops, what could happen?
  • Your previously dedicated audience is disappointed, and they unsubscribe in droves.
  • You ruin your relationships with some or all of the other bloggers and online entrepreneurs who helped promote your product.
  • You suddenly find yourself back at step one, rebuilding all the relationships that took you months or years to build – if you can salvage them at all.
Even if a product flop isn’t a worst-case scenario, it’s still bad for you and your blog.

The Sure-Fire Strategy for Creating Winning Products

Despite the risk to your reputation if your product flops, there’s some good news.
You can take steps to insure your product against embarrassing failure, and even guarantee its success.
How, you might ask?
Put your preconceptions to one side and start listening to your audience. Find out what they really want – not just what you think they want (or, worse, decide they need.)
Because if you don’t listen to your audience, you risk a scenario like the following:
A technology blogger wants to build a product that helps people learn how to use the hottest new tech gadget.
Since it’s something he’s certain will be helpful for his audience, he decides to move forward with creating the product.
He doesn’t take the time to see if any of his audience members have actually been asking about the gadget, or if they have complained about not understanding how it works.
When the product launches several months later, he wonders why very few of his audience want to buy it.
Do you see the problem here?
The blogger went ahead and created his product based purely on his own idea, rather than identifying a real need.
In other words, he created his product based on an untested assumption.
Fortunately, a better way exists:
Find out what people seem to want, and quickly test to see if they really want it.
But that prompts the question: how do you find out what they want?
It’s easy – you spy on them.

How to Gather Vital Intelligence About Your Audience

I can hear you now.
“Spy on my audience? Isn’t that illegal?”
Unless you’re the NSA, then the answer is likely yes. ;-)
But what we’re talking about here is less like agency-style spying and more like playing detective, as Leanne Regalla writes in her post on developing empathy.
Even if your blog doesn’t have much of an audience yet, you can still gather intelligence by spying on your desired audience in the places where they already hang out online.
Study comments left on popular blogs and forums related to your topic. What questions are people asking repeatedly?
Eavesdrop on conversations happening on social media. Which topics appear most often?

Create a Secret Dossier of Revealing Information

As you make observations about the topics and issues that come up most often, keep track of the data you gather.
Add this information to a spreadsheet, keeping track of which blogs or social media accounts the comments came from, and the exact language used.
As your spreadsheet grows, look for patterns. Does one topic area come up a lot? Within that topic area, is there a specific question that many people ask?
Before long, you will likely find a problem that you can solve for them!
And once you’ve narrowed in on a specific problem, it’s time to gather more in-depth information about it.

How to “Interrogate” Your Sources with Surveys and Interviews

The best way to gather information about what your audience wants is to ask them!
One way to do this is to create a simple survey, just one or two questions, asking what their biggest challenge is.
(For a more in-depth look at the subject, Linda Formichelli wrote a great post here at BBT on how to find out what your audience really wants.)
Share this survey with everyone on your email list, and also reach out to the people in your spreadsheet. You can also share the survey link on social media or advertise the survey online.
Take the information you gather from the survey responses and add it to a new sheet in your spreadsheet.
After you have gathered all the responses to your survey, you can go even deeper by conducting informational interviews with members of your audience or the survey respondents.
You can conduct these interviews over the phone or by video chat – and you’d be surprised how eager people are to share their perspectives with you, if they think you really want to know. During the interviews, you can go in depth about the topic and the problems they have.
Take the information you gathered from your in-depth interviews and… you guessed it: add it to your spreadsheet, on the same page as your survey data.

But What If Your Sources Refuse to Talk?

You may find yourself in the following situation:
You gather data for your spreadsheet by eavesdropping on blogs, forums, and social media feeds, but when you reach out with the survey questions, you get nothing but crickets.
Or, maybe you get a few responses, but they are all either off topic or unenthusiastic about the topic you asked about. Likewise, your offer of in-depth interviews was met with similar disinterest.
These are all strong signs you should go back to the drawing board.
Maybe you’ve focused on a problem people don’t feel strongly enough about. Or a problem they don’t believe anyone else can solve. But whatever the reason for the lack of interest, it’s probably time to move on.
But don’t be disheartened. This is actually a positive result. You just saved yourself a lot of wasted time and effort developing a product people don’t want!
Return to your spreadsheet. Eavesdrop in some new places. Gather more data. And repeat the process until you have a bunch of enthusiastic responses to your survey and interviews.
Remember that by conducting as much detailed research as you can in the beginning phases, you will avoid setting yourself up for a product flop later in the process.
By the end of this process, you should have quite a bit of data.
But what do you do with it all?

How to Get Laser-Focused on the Problem Your Product Will Solve

You’ll have collected a lot of data during the information gathering phase and it may seem like you have easily enough information to move forward.
But in truth, your data is still a little too raw to use for making important decisions about your product. You still need to do a little more work on it to ensure that your audience will respond enthusiastically when you make your eventual offer.
So your next step is to analyze the information you collected from your spy mission.
Open up the spreadsheet where you’ve been keeping all your data to the sheet with your survey and interview responses.
Here’s what to do next:
Sort the data by how in-depth the responses are and then discard the shortest answers. You’ll want to keep approximately the top 80 percent of the answers you received (i.e., remove the shortest 20 percent.)

Why Should I Throw My Hard-Earned Data Away?

It may sound counterintuitive to get rid of data that you worked so hard to gather, but the people who take the most time to respond and write the most detailed responses are also the most likely to pay for a solution to their problem.
Really!
After discarding the shortest responses, look at how many times each problem comes up, and see if there are patterns to the questions.
By the end of this process, you have likely uncovered the problem that your audience is practically begging you to fix for them.
But, before you move forward, one word of caution.
As you look for patterns, make sure you aren’t using the results to validate an idea youalready have, or throwing out any data that doesn’t support that original idea.
Consider this scenario:
A personal development blogger wants to teach a course that helps her audience overcome childhood trauma, based on a method that worked for her personally.
To validate her idea, she polls a number of friends in the health care and psychology fields and some of her audience members. The data comes back with mixed responses, but she sees that some of the responses include the method she is familiar with.
Based on those responses, she decides to move forward with creating the course.
Only a few students enroll when the course launches several months later. When she factors in the time costs of creating the material, the course ends up barely breaking even.
Do you see the problem this time?
The blogger selected the data points that confirmed her own idea, instead of objectively analyzing the data to find out what her audience really wanted to learn.

How to Determine If People Will Really Shell Out the Dough

By this point in the process, you’ve discovered and validated a problem that your audience (or desired audience) wants solved. You may even have some clues about the direction the solution should take.
So you can finally start creating your product, right?
Actually, no.
Let’s revisit the example of the personal development blogger. Not only did she let her own personal biases skew the data, but she also made another mistake. She created her course without validating the basic idea first. That’s why her launch was a flop.
Before creating your product, it’s crucially important to confirm it’s a solution people will pay for.
And the best way to do that is to sell a pilot version of the product.

What the Heck is a Pilot?

What we mean by a pilot is to offer a bare-bones version of your product or course to people who will be “early adopters.”
Most people won’t be willing to take the chance on your idea at this early stage, but that doesn’t matter. You’ll target those who are enthusiastic about getting in on the ground floor of your idea.
Your pilot members will be offered a significant discount off the eventual price of the full program in exchange for being actively involved in giving feedback as the product is in development.
To create your pilot, you’ll start with an outline of the material to be covered in the course, and only build out the course to what we call “minimum viable richness” – only as much content and supporting material as absolutely necessary to solve the problem for most people, and no more.
But, before you create any of that content, there’s one final level of validation: selling the pilot.

Let’s Sign Up Your First Paying Customers!

The ultimate validation of whether you have a viable product idea is to find out if people will actually open their purses and wallets to get it.
And the only way to do that is to offer your yet-to-be-created product for sale. Here’s how to do it.
First, you open a brief registration window for your course.
When you reach out with your sales pitch, you will want to use the same language your audience uses to describe the problem your pilot solves.
This is where the in-depth research you did in previous steps will really come in handy; look back at the survey responses and notes from your interviews. How did the respondents describe the problem? Use their exact words in your sales copy.
(We’ve created a free set of templates that can help you with the sales portion of your piloting process. These templates include a sales conversation script as well as email swipe files that you can use to entice your audience to join your pilot.)
You’ll base the number of spots available in the pilot on the costs you need to cover, balanced against the number of people that you feel comfortable supporting during the pilot.
While your registration window is open, promote it like crazy. Email your own audience, call in favors from other bloggers, and talk about it on social media.
Once your registration window has closed, and assuming you’ve reached the numbers you need for a successful pilot, it’s time to start creating the content based on your outline.
For many products – like training courses – you can roll the material out incrementally, module by module, collecting valuable feedback along the way. This way, your eager customers are not waiting months to get the product.
Once the pilot is complete, you can use the feedback to build out your full product and relaunch it – with an increased price tag.

What If Not Enough People Buy The Pilot?

If you don’t fill enough spots to make your pilot viable, then it’s a sign that your product is not a good match for the market.
This is disappointing of course, but not nearly as disappointing as creating the entire product and then finding out nobody will buy it! In this Kickstarter era, most people understand that not every cool new product sees the light of day.
So if you’re candid with your early adopters, thank them for their support, and (of course) issue a prompt refund, you should find they’ll be receptive to hearing about your next product.

Discover Your Perfect Product and Watch It Sell Like Crazy

This process may sound like a lot of work, and the truth is… it is!
Creating products that solve people’s thorniest problems requires time and effort.
Of course, as a serious blogger, you’re not afraid of working hard – if it gets results. So there’s one type of hard work you want to avoid at all costs…
Hard work that turns out to be wasted effort.
That’s why it’s much better to spend time up front to determine if your product will sell, rather than spending countless hours and dollars to create something that flops.
So what are you waiting for?
There’s an audience out there that wants to pay you to solve their biggest problem.
Go solve it!
To view the original article Click Here 

Tuesday 27 January 2015

The 7 Steps to Create an Awesome Contest on Instagram


The 7 Must Do Steps to Running a Contest on Instagram

Do you want to learn how to run a successful contest on Instagram? Well, you’re about to find out…

With more than 300 million active users, Instagram has fast become one of the most popular social media platforms to date. The simple notion of snapping a photo and sharing it with the world has turned into a $35 billion idea, and it just goes to show how powerful visual communication can be. Running a social media contest has plenty of benefits such as building brand awareness; gaining more followers; and increasing your leads, but since Instagram is a new playing field for many businesses, it can be hard to know where to begin.

If you want to run a successful Instagram contest but don’t know where to start, take a look at these 7 steps to create a contest on Instagram.


Step 1: Plan a strategy


Creating a strategy is the most important step as it will help bring clarity to your campaign. Start by setting out achievable goals so you have something to work towards. Whether it’s increasing your followers by 50% or gaining 100 leads, you need to set out credible goals so you can measure how successful your campaign has been, once it’s over.

In the planning stages it’s also important to think about the T&C’s. How does a person enter your contest? There’s plenty of options including like-to-win; tag your Instagram name; enter their email; follow your page; or use a unique hashtag within their photo.

Once you’ve considered your contest type, think about how long you want it to run for. It should have an expiration date so you can encourage a sense of urgency, but make sure you run it long enough to get the most out of your campaign. This infographic suggests the best duration is between 25 – 60 days, but so long as you are putting in the right promotion, you should see the results you want.


Step 2: Check out the competition


Another crucial step to take before you jump head first into a contest is to snoop out the competition. Has your competitor run a similar contest? What theme did they use? How successful was it?

This kind of data can help influence the steps that you put in place for your own contest. You can take inspiration from their strategy and use that as a foundation to make yours better!


Step 3: Decide on a theme


Marketing is all about telling your brand’s story, and Instagram is the perfect tool to help you do that. You should choose a theme that will reflect your brand’s story, making it creative and inviting enough for people to want to join in. This can be the difference between 10 likes or 1000, so take your time and consider who your audience is and the type of content that they are likely to post.

Take Tiffany & Co as a great example. They chose a theme around ‘true love’ and encouraged fans to submit photos of what they defined true love to be. As an iconic jeweler that oozes romance, this theme suited their story perfectly.

The 7 Steps to Create an Awesome Contest on Instagram 1

Not only does this type of User Generated Content campaign (UGC) encourage people to engage with your brand, but it also helps to promote your products on a broad scale, helping to create a winning campaign!


Step 4: Choose your hashtag


When people enter your competition you should make sure they add a unique hashtag to the post so you can build up a stream of photo’s to pick the winner from. Sure, it needs to be relevant to the theme of your campaign as mentioned in step 3, but it should also be memorable and easy to search for.

Remember that you’ll want to utilize the hashtag across all of your social platforms, so keep it consistent with your brand. It may be tempting to use a popular hashtag such as #win, but this will be harder to judge the entrants as you’ll find many posts that are not relevant to your contest.

If you want to do some hashtag research on your competitors then check out Talkwalker as it’s a great tool that lets you analyze and compare hashtag campaigns.


Step 5: Design awesome artwork


Now you’ve got the basics out the way it’s time to put the wheels in motion and there’s no better way than to start designing the artwork. Take advantage of Instagram’s ‘arty’ style and get creative with your banners.

To make your contest a success, include an example photo of what you want participants to upload, simple instructions on how to enter, the competition hashtag and ask a question to encourage your audience to get involved.
Take a look at Mark Jacons #CastMeMarc as below as the perfect example…
The 7 Steps to Create an Awesome Contest on Instagram 1

Step 6: Promote across all channels


Clearly you want to bring more exposure to your campaign so start cross promoting on all of your social platforms. In addition to sending out emails to your database, try and reach out to influencers and write a blog for them which mentions your contest within the post.

You should also add your promotional banners to your blog, Twitter, Facebook pages etc and start posting about it when your audience is around.
So when should you post?

Well according to this post, users will interact with your Instagram pictures regardless of when you post them. But if you’re promoting it across other channels then research shows that the best time on Facebook is 1pm – 4pm, and on Twitter it’s 1pm – 3pm. It’s also good practice to check out your social media analytics to find out when your audience is most engaged.


Step 7: Measure your success


Once the contest is complete and you’ve notified the winner, it’s time to measure the success of your campaign. Did you reach the goals that you made in step 1? Third party apps such as Iconosquare will not only help you run an Instagram campaign, but it lets you check out the metrics of the campaign too.

Don’t forget to use the data that you’ve gained from your contest to your advantage. Write a blog post about the winner and include their photo; send an email to all who took part; and keep engaging with your new followers!


The rest is up to you!


Hopefully that has given you every step you need to run a contest, so now the rest is up to you. With 60 million photos uploaded to this platform everyday, it’s clear that Instagram offers a valuable opportunity to any business. Think carefully about your strategy and your contest theme, to help bring the exposure your brand needs. Good luck.

If you liked this article you may also like:

12 Awesome Pinterest Tools to Power Up Your Marketing 

15 Ways to Optimize Your Facebook Ads 

How to Generate More Web Content From Google Hangouts-on-air

To view the original article Click Here